
How to Adjust Your Front Derailleur
This guide will cover adjusting the front derailleur on a bicycle.
Tools:
- Repair stand
- Small Phillips or Flat blade screwdriver
- Needle nose pliers
- 5mm Allen wrench
1. Place your bike in a repair stand if you have one, it will make the adjustment much easier. (You can always build a repair stand yourself.)
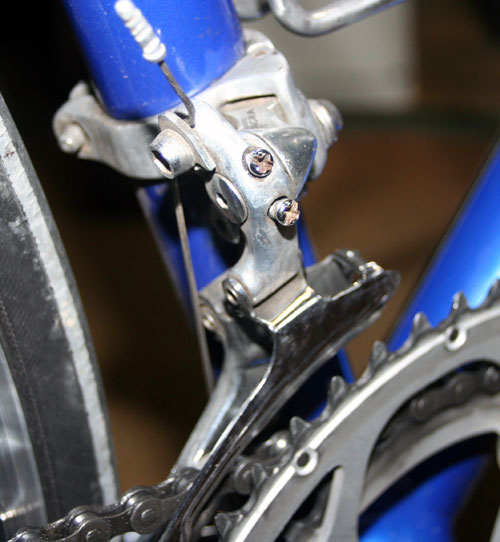
2. Put the chain on the small chainring and large cog (your lowest gear.) Locate the adjusting screw for the lower limit, sometimes marked with an L. If the screws are lined up horizontally, it will be the one closest to the frame. Lined up vertically, it will be the screw on top.
(To be 100% sure, you’ll just have to move the derailleur cage and see which screw stops the derailleur from moving too far towards the frame.)
3. Once you have found the screw, move it in or out slightly to set the stopping point for the derailleur cage. Turning the screw counterclockwise will allow more space for the chain, while turning it clockwise will close the gap.
The inner plate of the derailleur cage should be 1 or 2 mm from the chain. You want to achieve a setting where you can have the chain in the low gear without it rubbing the derailleur, but at the same time, there should not be enough space for the chain to fall off onto the bottom bracket shell.
4. Now shift the chain onto the large chainring and small cog (your biggest gear.) Set the other adjusting screw (sometimes marked H) so that the outer plate of the cage is 1 or 2 mm beyond the outside of the chain.
If the screw is unmarked, it would be the outermost screw horizontally, or on the bottom, when lined up vertically.
Turning the screw counterclockwise will allow more space for the chain, while turning it clockwise will prevent the chain from shifting off onto your foot.
5. Once the high limit screw is set, check the low limit screw again to make sure it is still OK.
6. Shift through the gears to check all these adjustments. You may have to expand them slightly, but be sure that the settings aren’t wide enough to allow the chain to fall off onto the BB shell or the crankarm.
These adjustments should allow you to run the chain through the gears without rubbing. Be careful not to “cross chain,” which is where you are on the small chainring and small cog or large chainring and large cog - that will surely cause rubbing!
7. Now you can test ride the bike and enjoy shifting!
Although, a test ride may also reveal that you need to tweak the shifting once more!
This video will show you how to adjust the front derailleur on a road or mountain bike.
Excellent video , very helpful , thank you so much!
Told me exactly what and wanted to know …
Easy to understand…very well done…
Really appreciate it…
Thank you…..
It was very helpful. Thank you1!
Thank you, so easy to follow and understand. Very helpful. Kind Regards, Celia
Very good! For a level 1 bike dummie like me, I can still understand it. Thank you!
All the manuals I’ve seen tell you to loosen the cable before you adjust front or rear derailleur. I notice you didn’t do that.
Another fine lesson. Glad to know i have been doing it right. Nothing like positive reinforcement.
This is quality work regarding the topic! I guess I’ll have to bookmark this page. See my website Webemail24 for content about Self-Storage Units and I hope it gets your seal of approval, too!
Nice post! You have written useful and practical information. Take a look at my web blog Articlecity I’m sure you’ll find supplementry information about Social Media Marketing you can gain new insights from.
It appears that you know a lot about this topic. I expect to learn more from your upcoming updates. Of course, you are very much welcomed to my website Article Sphere about Mobile Gaming.